An invoice is an important document that reflects the agreement between a business owner and their customer. Because this document reflects the business, it should contain accurate information.
Small business owners and freelancers can use Skynova’s free invoice generator to create this vital business document. Focus on filling out the invoice correctly so that the customer understands the terms of the invoice. Use this checklist to ensure that your invoicing has all the information the customer requires to swiftly pay for your goods or services:
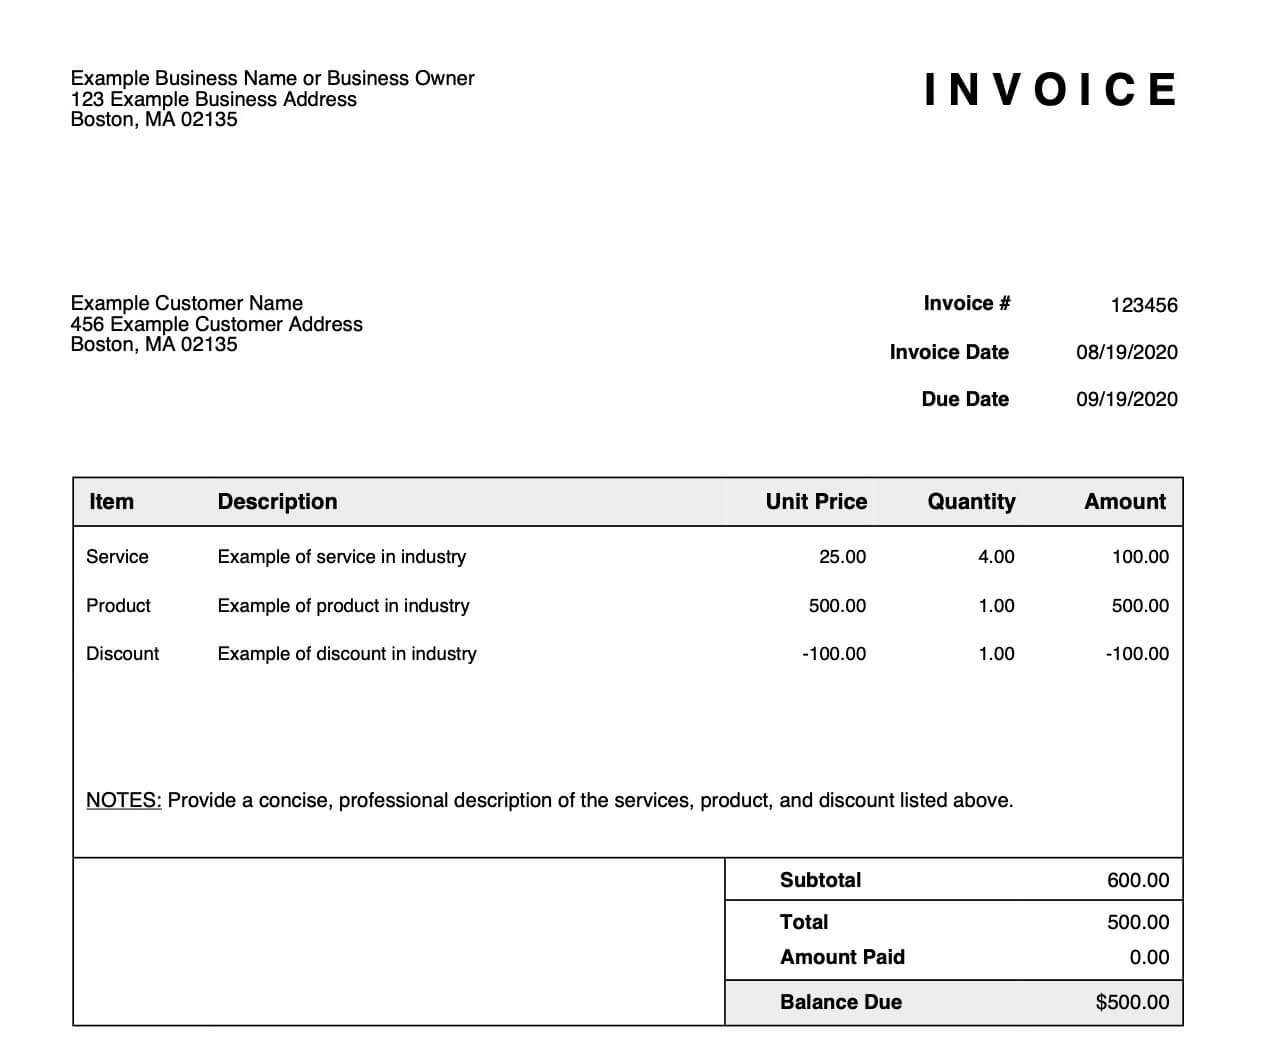
- Company name, address, phone number, and email address
- Customer name, address, phone number, and email address
- Unique invoice number
- Invoice date
- The due date for payment by the customer
- Line item type (service/hours/days/product/discount)
- Line item description
- Unit price
- Unit quantity
- Subtotal of all line items
- Sales tax (if relevant)
- Total amount due
- Payment terms, accepted payment methods, and/or disclaimer in the "Notes" section
- Bank details for customer payment in the "Notes" section
How to Fill Out a Small Business Invoice
Completing an online invoice is a simple process when using free invoice templates designed to support this process. Users can take advantage of Skynova’s free invoicing software to create professional invoices that leave the right impression of their business. Follow the steps below to produce a new invoice that shows your company takes its reputation seriously.
When you’re done, you can edit, print, or download the invoice as a PDF. You won’t have to worry about creating your invoices in Excel, Microsoft Word, or by paper anymore, as you can do everything online — including sending them to customer email addresses. You’ll also see when your customer opens the invoice, resulting in a more efficient payment process.
Personalize the Invoice
The Skynova invoice template allows company owners to include a distinctive logo on their statements, adding a personalized touch that enhances recognition and reputation. At the top of the invoice template, you will notice an option to customize the document. Click on "Show Customization Options" above the template. This will allow you to check the "Logo" option.
Opposite "From," "Your Logo Here" is highlighted in blue. Select the "Browse" button and choose your logo from where it’s stored on your computer. Click "Save" above the newly uploaded image to enjoy a personalized invoice for better branding.
Include Contact Information
Next, fill in your business name in the field under "From." Underneath that, add a business address, followed by your business email and any contact numbers. Proceed to the next field labeled "To" and input the customer’s name. Add the customer’s address in the line below, including their email address (if available) and phone number. Always double-check the contact information, as your professionalism relies on invoicing the right person with the correct details.
Add the Invoice Date and Invoice Due Date
Input the "Invoice Date" in the field on the right-hand side of the document, directly under the logo uploaded during the first step. You can enter the date by clicking on the blue automated calendar icon directly to the right of the "Invoice Date" field.
Typically, business owners will input the date on which the invoice is generated, but unique business processes can mean that a future date or recent past date may be preferred. Now, select the "Due Date" for customer payment by applying the same process. Click on the small blue calendar icon to the right of "Due Date" to select the preferred date you wish the customer to make payment.
Usually, the invoice is payable within 30 days from the invoice date, but an agreement with the customer may require the input of a date that is seven or 15 days in the future or any other number of days agreed to.
Include Details
Be clear about item and line details when invoicing customers. Underneath "Item," you’ll see a drop-down menu where you can choose from "Service," "Hours," "Days," "Product," or "Discount." Clearly describe the materials, services, or labor in the "Description" field. Add the "Unit Price" and "Quantity" of items provided to arrive at an automatic subtotal, which you will see reflected in the "Amount" field. Continue adding items to separate lines until everything has been accounted for.
If this is your first invoice, add a unique invoice number in the "Invoice #" field. A distinct reference number will help you keep track of which invoices are for which customers. It’ll also help prevent duplication of invoices. The great thing about Skynova’s invoice template is that when you create your second invoice, the form will automatically increment from the previous invoice to ensure it’s unique. It will never allow you to save a non-unique invoice number.
Your invoice can also be converted to a purchase order under the customization options, where you may elect to add sales tax to the form. The template supports city, county, and state sales taxes, plus any combinations and cash or accrual, but you’ll have to save your invoice first. If you’re interested in including different sales taxes on your invoice, you’ll need Skynova’s accounting module.
Add Payment Terms
By including a due date, terms can be added that state the customer can pay the invoice in full or in installments (if arranged) without incurring interest. If accounts are paid after the specified due date, a term can be included, confirming how the business owner can elect to charge a fee related to late payments. Always agree on the terms with the customer before completing the invoice.
The terms of the invoice payment date may also provide for a discount if paid within 10 days from the "Invoice Date." If the business owner wishes to offer this feature, they can add "5% 10 Net 30" (or another) as a payment term. This means that the customer is entitled to a 5% discount on the total price if the invoice is paid within 10 days from the due date. If the customer does not make payment within 10 days, the offer falls away, and the full amount becomes due and payable.
Skynova further recommends that users add banking details to the free invoice template in the "Notes" section. You can also use this feature to advise customers on what payment options are available and whether your business has the facilities to accept online payments via credit card, PayPal, or other means.
What Do You Write on the Bottom of an Invoice?
The message at the bottom of the invoice is the ideal means to thank customers for their purchases, but it is also useful for other purposes. Business owners can include payment terms at the bottom of the invoice in the "Notes" section, as agreed with customers.
You can also describe line items if insufficient space is available in the "Description" field. Bank details may also be added to the "Notes" section to promote faster payments from customers.
The end of the invoice is also ideal for offering promotions, special seasonal discounts, or a message of goodwill. You can wish customers well for certain holidays or thank them for their loyal patronage. Payment reminders may also be written at the end of the invoice to remind customers to settle their bills on time or take advantage of early payment discounts.
How to Include Discounts on an Invoice
Include a free on board (FOB) shipping explanation in the "Notes" section of Skynova’s free invoice template when applicable. You can apply two FOB shipping practices. The "FOB selling point" describes how the seller or business owner releases the title of and responsibility for the items sent to the customer once shipped from the selling point.
"FOB destination" explains the conditions under which products are shipped to customers, along with ownership details inherent in the FOB transaction method. After the items have been delivered and signed for, the exchange is regarded as complete, and ownership of the items transfers to the customer.
It’s important that the sender or business owner specify the FOB method in the "Notes" section of the invoice for customer clarity. Just as the delivery cost must be added to the invoice, you can include a discount on the invoice. Select the "Item" drop-down menu to choose the "Discount" option. Type in the reason for the discount under the "Description" header and follow up with the dollar amount of the discount.
The "Notes" field may then be used to explain the FOB agreement selected so that the customer understands who is responsible for the delivery costs and ownership of the products shipped.
Create a Customized Invoice With Skynova’s Sales Invoice Template
Skynova is dedicated to supporting small businesses with free invoice templates and accounting software. Our free sales invoice software is intuitive and can help drive quicker customer payments. Skynova’s other products, like the quote, estimate, receipt templates, are equally easy to use and beneficial.
Use Skynova’s accounting and other software products and free templates to streamline business administration now so that you can enjoy the freedom of attracting more customers who pay on receipt of professional business invoices.